Tuesday, May 29, 2012

Keel-Haul (U.S. Navy Admiral)

File Name: Colbym, Everett P.
Birthplace: Charlottesville, Virginia
Primary Specialty: Command
Secondary Specialty: Pilot

Keel-Haul graduated from Annapolis and Navy Flight School, and flew Phantom F-4's off the Intrepid in the late 1960s. He attended the Naval War College in Newport, RI and the Armed Forces Staff College, and is a holder of the Navy Cross, DFC and Air Medal. He is a respected military historian, a nationally-rated chess player, and a clarinet player of questionable talent.

I've been meaning to do this figure for quite a while.  But when it came time to paint, I decided not to give him the mismatched uniform items (Officer's khaki pants, Enlisted man's blue shirt, Officer's dress white cap) and go with a proper U.S. Navy uniform.  I dug up a bunch of photos to make sure that I got the details as correct as possible.

Sunday, May 27, 2012

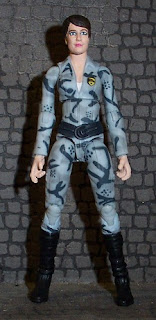
Agent Maria Hill (Command & Control Liason)

I don't usually do a lot of cross-overs, but after seeing The Avengers recently, it occurred to me that Agent Maria Hill would make a great background character for the Command Center in my Pit Headquarters diorama.  I decided that she'd be a liason from some government agency, tasked with coordinating and overseeing Intelligence being funneled to the Joe team.  All of the personnel working in that scene are dressed in Rise of Cobra style camouflage fatigues (I had to use those figures for something, right?), so with the uniform set, I just needed to figure out what head to use.  For quite some time, I've wondered if the RoC Attack on the Pit Baroness head sculpt might actually be good under the gobs of factory paint, so I decided to try and make it work.  I removed the hair piece and used acetone to strip all of the paint.  I was left with the bare head, cast in black plastic.  I then sculpted new hair on using several still photos of the actress from the film.  It was a fairly simple style, with the hair pulled back into a bun.  Not too difficult, but I am not usually much of a sculptor, so I was very pleased with how the it turned out.  With that done, I just had to repaint the head.  As I had suspected, I found that the sculpt looked pretty good with a decent paint application!

Wednesday, May 2, 2012

Badger (All-Terrain 4X4 Assault Vehicle)

This vehicle was actually created over a year ago.  Shortly after finishing it, I got the idea to make a driver for the vehicle and enter him in the Pimp Daddy Destro My Ride Contest at HissTank.


The contest's Figure Category required a new character to be the driver for a vehicle that didn't originally come with one. The character, which I appropriately named Cheesehead, was loosely based on my son (in the respect that he wanted it to be him and helped me decide on the background). The figure ended up winning first place in it's category!


Sadly, I somehow forgot to take some pics that actually featured the vehicle, so I'm correcting that now...

VAMP (Multi-Purpose Assault Vehicle)

This is a custom that I have wanted to do since I was 10 years old.  Growing up, I had both the VAMP and the VAMP Mk II, and it always kind of bothered me that they were not uniform in color.  From a marketing standpoint it probably made sense for Hasbro to make them different colors because they hoped that the new color would appeal to kids and also because most parents would likely be reluctant to buy duplicate vehicle that differ only in the mounted weapon system (I know that would have been the case with my mother).  So when a fellow collector gave me a second 25th Anniversary VAMP, I knew exactly what I was going to do with it!  


 The missile housing and mount came from a vintage Tiger Sting.  I repainted them to match the metallic colors of the cannon on the original VAMP.  I also drilled two small holes in the rear of the housing so that the cables from the cannon could be connected to it.  This gives the appearance that the driver can control the missile launcher, just as the driver in the original vehicle could control the cannon.  To mount the missile launcher, I had to Dremel the mounting hole a bit.  I ended up having to bore into the vehicle's rear deck a bit, but I got a good mounting hole, where the launcher mount fits snugly and can still swivel.  So while this wasn't the most challenging thing I've done in a while, it was pretty satisfying.