Thursday, December 30, 2010

Duke (G.I. Joe Team First Sergeant)

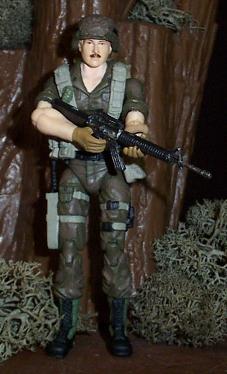
While he has never been one of my favorite characters, there's no denying that Duke is a great character. So when I saw how great the latest Duke headsculpt was in the Pursuit of Cobra line, I decided to give mine an upgrade.

Parts: Head (PoC Duke wave 3), Body (25th Anniversary Duke v26), Helmet (bbi Elite Force figure), M4 rifle (Marauder, Inc.).

When I started this figure, I didn't plan on posting it. It's basically just a headswap with a new paintjob and some new accessories. The only Duke figure I had was the 25th Anniversary jetpack version which had a really light colored shirt. So I snatched him out of my Pit display and repainted his shirt. While I was at it, I touched up the paint apps on the belt to make them a little bit different shade of green than his trousers. The bandolier was silver (ummm... why?) so it needed to be repainted, as well. With the smaller details, I tried to model this figure after the awesome 12" Duke that was produced by Sideshow. The rifle is not the same manufacturer, but it was the closest I could get. So I painted it and the helmet to match the 12" figure. I also liked the "slightly graying" look of the Sideshow figure. I thought it was a good look for Duke, so I drybrushed light gray over his hair. To finish things off, I repainted the boots with a couple different tan colors to simulate the current style of boots issued to US troops. The whole figure was given a liberal application of Testors Dull-Cote before he rejoined his troops.

Wednesday, December 22, 2010

Devilfish, Tigerfish & Kittenfish - Oh my!!!

Now that all three of our G.I. Joe Fast Attack Boats are completed, the kids wanted me to take some group shots. I've got to admit that I am really happy with how these turned out...

Kittenfish (G.I. Joe Fast Attack Boat)

Yep - you guessed it! As soon as I finished the Tigerfish for my son, my little girl decided that she needed a boat, as well. Fortunately, I had predicted this and I had already scored a nice Devilfish on ebay...


As I had done with my Devilfish and my son's Tigerfish, I used the Dremel to remove the footpegs, which are far too big for the modern era Joes. The old sticker residue was removed using a very gentle dishwashing liquid. The upper portion of the boat was spray-painted with satin pink.


All of the remaining details were painted exactly the same as my Devilfish. The "no-skid" was painted using flat black. I used a lot of aluminum, steel, gunmetal and other colors to bring out some of the sculpted details. The decals came from our pal Ruben in Mexico - except for the prominent Hello Kitty logo on the bow (you should have seen her reaction to that little detail). Finally, the entire boat was given a liberal application of Dull-Cote to protect the paint. I have tentatively dubbed this boat the Kittenfish, but I may change it if I think of something less silly...

Tigerfish (G.I. Joe Fast Attack Boat)

So after I finished my Devilfish, my son was just completely enamored with it. A couple of months earlier I had given him my younger brother's old TigerFish and he immediately asked me to "upgrade" it...


As I had done with my Devilfish, I used the Dremel to remove the footpegs, which are far too big for the modern era Joes. The old sticker residue was removed using a very gentle dishwashing liquid. Where I screwed up here was in allowing my son to help without explaining that if he scrubbed too hard, it would also remove the paint. So once all the sticker residue was gone, we had some seriously messed up white and brown areas. I don't own an airbrush, so the best I was able to do was to use spray-paint cans to try and recreate the gradual "fade-in" of those areas. While it doesn't look quite the same as it originally did, I think the results were good considering the limitations we had.


The missiles and engine covers were spray-painted red because the plastic had faded to a really lame-looking pink. The hull piece was spray-painted with flat white. All of the remaining details were painted exactly the same as my Devilfish. The "no-skid" was painted using flat black. I used a lot of aluminum, steel, gunmetal and other colors to bring out some of the sculpted details. The decals came from our pal Ruben in Mexico. Finally, the entire boat was given a liberal application of Dull-Cote to protect the paint from the future battles my son is currently planning.

Wednesday, December 15, 2010

Gung Ho (G.I. Joe Marine)

Okay, without exaggerating, I think this is the 6th or 7th custom version of Gung Ho that I've done. How weird is it that it took me this long to get around to doing his original 1983 look? Lately, I've been focusing on trying to fill in my 25th Anniversary collection with all of my childhood favorites so I had to get to this eventually...

Parts: Head, Torso, Upper Arms & A.L.I.C.E. pack (Comic Pack Gung Ho v19), Lower Arms (RoC Tunnel Rat v11), Legs & Vest (25th Anniversary Gung Ho v18), XM-79 Grenade Launcher (ARAH Gung Ho v1).

While version 18 of Gung Ho had the classic colors of the uniform correct, the character's skin tone was really weird, causing many to refer to him as "zombie Gung Ho". Version 19 had normal skin tone, but strayed away from the classic colors in favor of a more realistic green and brown camouflage. Essentially what I did here was take the legs from the zombie version and throw them on the non-zombie version. Then, I just needed to paint-match the pelvis area of the figure's trousers to the legs. This is an idea that I borrowed from several different customizers at HissTank.com. I also swapped the lower arms for a set that didn't have the silly-looking armbands. It always bothered me that the new, modern era sculpt had load bearing straps sculpted onto his vest (as if he were wearing webgear over the vest) but they never bothered to paint it properly. I took care of that here. I also painted the Marine Corps utility cover OD green and then painted the Eagle, Globe & Anchor insignia with black. I also gave him a better mustache (which I have done exactly the same with every Gung Ho figure I own). I really like the M-79 that came with the 25th Anniversary versions of Gung Ho, but I chose to arm him with his original 1983 weapon because I thought it was more appropriate for my purposes. The 40mm HE rounds on his left thigh were painted to match a reference photo of what they actually look like. The loops holding the rounds in place were painted green, to simulate a cloth bandolier-type thigh rig. The A.L.I.C.E. pack was detailed with several different shades of green and the frame was painted black - again, because this is what one actually looks like.

Wednesday, November 24, 2010

Dreadnok Swamp Hideout

I've made the majority of the Dreadnoks, so I suppose it was just a matter of time before I got around to making a happy little home for them. This was a joint project with my daughter Kate.

Most of my smaller dioramas are built on shelves that can be moved around easily on the wall (using pegboard and brackets). In this case, the entire shelf was painted a pale, sickly green color to simulate stagnant water. About half of the shelf was then sprayed with a textured adhesive to simulate earth. The adhesive was spray-painted brown The green scrub plants are actually lichen that I bought nearly 10 years ago at a model railroad shop. They were attached while the painted adhesive was still wet, so they stay put nicely. The cabin itself is made entirely of foamboard. I cut the pieces out with an X-acto knife and then assembled them using hot glue. Afterward, we glued craft sticks to the outside. I cut the rounded ends off and Kate did all of the gluing. The porch and the pier were made the exact same way. The entire cabin, porch and pier were all spray-painted dark brown. Once they were dry, Kate dry-brushed them with a very light tan. The roof was made from a piece of poster board. We cut it to the right shape and then folded it like an accordian to get it to look somewhat corrugated. The roof was painted to resemble unpainted metal. The "rust" was applied using a foam paint applicator. The background is fishtank scenery we picked up at a local pet store. The barrels were purchased a few years ago at a hobby store and have been kicking around in my parts box. The two fuel drums that Zarana is sitting on were part of a military playset that I owned when I was a kid. The Doom Cycle is obvious, but the other motorcycle was made by Maisto (you can find them at WalMart). If you look hard, you can see two pieces of 1/18 scale dollhouse furniture inside the cabin.

We still have some additional figures to add (once we've made them, that is) and a few things we want to tweak down the road (there's a reason that we included water and a pier), so watch for updates!

H.I.S.S. II (Cobra High Speed Sentry, MK2)

This was my little brother's H.I.S.S. II, another item rescued from mom's attic. The goal here wasn't really to re-invent the vehicle, but it looked so horrible it was obvious that some work was required. Oh, and I hated the silly red cannons!


The whole vehicle was spray-painted with grey. The tracks were painted black and then dry-brushed with steel. All of the weapons were spray-painted with silver and then dry-brushed with gunmetal. The replacement decals came from Ruben Jimenez.

Track Viper (Cobra Tank Driver)

Track Vipers are the elite tank drivers that are chosen to operate the H.I.S.S. II in Cobra's armored divisions. This might be the most ridiculously simple custom I've ever done (and I do a lot of simple customs)...

Parts: Head (ARAH Track Viper v1), Body (25th Anniversary Matt Tracker).

Step one - Dremel head to fit neck post.

Step two - Place head on neck post. Done!

Monday, November 22, 2010

Devilfish (G.I. Joe Fast Attack Boat)

This is another of my childhood toys that was rescued from mom's attic. It had reall seen better days, so I decided to spruce it up a bit...


Two of the missile mounting studs had been broken off back in the 80's, so I used the Dremel to smooth these areas out a bit as if the studs were never there. I also removed the footpegs, which are far too big for the modern era Joes. Before putting the Dremel away, I also drilled a small holed in the housing behind the seat. This allows the SCUBA gear from RoC Shipwreck to be attached there. It seemed logical that a guy would need some way to escape if his boat was crippled and the bad guys were closing in. Once the Dremeling was finished, the entire top portion was spray-painted with Testors Competition Orange. The hull piece was spray-painted with flat grey. The "no-skid" was painted using flat black. For those who don't know, this is essentially a very gritty paint used by naval forces to make an area more or less "slip-proof". Seemed like a good idea for the areas where a person would be getting in and out of the boat.

I used a lot of aluminum, steel, gunmetal and other colors to bring out some of the sculpted details. The replacement decals came from our pal Ruben in Mexico.

Repeater (Steadi-Cam Machine Gunner)

I wanted a modern era version of Repeater that was more true to the original character design, so I whipped up this very simple part-swap custom.

Parts: Head (RoC TRU Exclusive 5-pack Zartan), Body (RoC TRU Exclusive 5-pack Footloose), Vest & Machine Gun (RoC TRU Exclusive 5-pack Repeater), Backpack / Ammo Carrier (RoC Neo Viper), FN F2000 Assault Rifle (RoC Sgt Stone), Pistol Belt & FN Five SeveN (RoC General Hawk).

There was really not much to this custom. The only real modifications were to the weapons. The F2000 had a small hole drilled in the stock so that it could be mounted on his backpack / ammo carrier, for use as a back-up weapon. The Machine Gun had the original pistol grip cut off. I then trimmed the small stock down to resemble the type of hand-grip trigger mechanism found on the original figure's weapon. I also removed the secondary grip from the right-hand side of the weapon and re-installed it on the left-hand side. Finally, the ammo carrier had a rectangular slot cut in the bottom so that the ammunition appears to actually "feed" from it. All other modifications were simple paint applications.

Sunday, October 3, 2010

Shipwreck (Navy SEAL)

This is a figure I've wanted to do ever since I first became acquainted with the DDP America's Elite series. I really liked the long hair, watch-cap, beard-but-no-mustache look the artist gave Shipwreck. At the same time, the RoC Shipwreck figure was one of my favorites from that line. I mean, seriously, is there anyone that wouldn't have liked seeing Shipwreck in the film? Anyway, I eventually decided to try combining what I liked from each look. This may not be one of the more difficult or impressive customs I've ever done, but at the moment it is one of my favorites. I'm calling this "City Strike Shipwreck" because he fits so well with my other Pursuit of Cobra figures...

Parts: Entire figure (RoC Shipwreck), Hair (BnB Razor Ramon), H&K G36 Assault Rifle (RoC Pit Commando).


Beachhead (Ranger)

This was basically a rainy-day project when I had no better ideas. The Beachhead figure from the RoC Snarler Cycle set was cool, but I wanted him to fit in better with the "blue camo" appearance of my other RoC figures. So, a new pair of legs and a bit of repainting...


Parts: Head, Torso & Arms (RoC Beachhead), Legs (RoC Sgt Stone), Helmet & Gasmask (PoC Beachhead), Assault Rifle, Ammunition Bag & Spare Magazine (25th Anniversary Beachhead), Vest (???).

Slipstream (X-30 Conquest Pilot)

So as I continued my quest to complete my own 25th Anniversary collection, I came to realize that the "Lt Slip Stream" figure that Hasbro offered us was nothing more than a kit-bash of easily obtained parts. I already had the head I needed, so I set about getting the rest of the parts through trades. A little repainting, and here he is...

Parts: Head (25th Anniversary Tripwire), Torso & arms (25th Anniversary Snow Job), Legs (25th Anniversary Wild Bill), Feet (RoC Wild Bill).

Thursday, September 9, 2010

Law and Order (Military Policeman and K-9 Partner)

This is another "improvement" upon a figure from the Toys R Us Exclusive RoC Desert 5-pack.

Parts: Entire figure (RoC Law), Submachinegun (25th Anniversary Shipwreck), Tactical Vest (RoC Pit Commando), Helmet (RoC Law), Baton (RoC Law), Dog (RoC Order).

Supplies: Paintbrushes, Testors paints, Polly Scale paints, Testors Dull-Cote.

Reference: Still photos of the ARAH Law & Order figures.

Nothing particularly special about this custom. It is a straight repaint of the RoC Law & Order figures that came in the Toys R Us Exclusive 5-pack. I didn't really have an issue with the desert camouflage, but I wanted something closer to the classic look, so I painted them according to that color scheme. The original figure had his shirt tucked in and the sleeves rolled up, but I liked the overall look of this when it was finished. The hardest part of this whole thing was painting the dog's fur to look somewhat realistic!

Wednesday, September 1, 2010

Sgt Slaughter (G.I. Joe Drill Instructor)

When the 2010 SDCC Exclusive Sgt Slaughter was announced, I knew that both my son and I would have to have one. His preference was the USA version, while I wanted the TTT version. Most of you know that the demand for these figures far exceeded the supply and many of us were left without our Sarge figures. My cousin was able to score one for Adam, but I still didn't have mine. Eventually, I obtained a couple of head casts from HissTank.com member returnofplex. One went to my cousin as partial payment for Adam's Sarge figure. The other was used for this custom figure...

Parts: Head (SDCC Sgt Slaughter cast), Torso & Arms (RoC Copperhead), Legs (RoC Gung Ho), M249 SAW (Marauder, Inc.).

Supplies: Dremel, paintbrushes, Testors paints, Folk Art paints, Testors Dull-Cote.

Reference: My son's SDCC Sgt Slaughter figure.

I wasn't really trying to make an exact duplicate of any particular version of the Sarge, I just wanted one that had a combat-ready look to it. I used nail polish remover to get rid of the Cobra emblem on the chest. That meant no painting above the waist (aside from the head, of course). The pants were painted green and then given a more-or-less Woodland camouflage pattern. The boots were painted as green-sided jungle boots (my favorite when I was a Marine grunt). The head had to be Dremeled out so that it would fit the neck post. Afterward, I painted it to match my son's SDCC Sarge as closely as possible. To be honest, I've seen much better Sgt Slaughter customs, but I'm pretty happy with this one.

Gung Ho (G.I. Joe Marine)

Yep, another version of Gung Ho! I don't seem to get tired of making this guy. This one was based on his appearance as part of Lt Falcon's reconnaissance team which infiltrated Cobra Island during the Cobra Civil War.

Parts: Head, Upper Torso, Lower Torso & Upper Arms (Comic Pack Gung Ho), Lower Arms (RoC Tunnel Rat), Legs (RoC Sgt Stone), Vest (Comic Pack Gung Ho), M16A2 (Marauder, Inc.), ALICE pack (Comic Pack Gung Ho).

Supplies:
Super Sculpey, super glue, Paintbrushes, Testors paints, Folk Art paints and Testors Dull-Cote.

Reference: G.I. Joe: A Real American Hero issues #73 through #76.

The base figure was not modified in any significant way, other than the swapping of the legs and the lower arms. The entire figure was then repainted according to the references.

Note: I deviated just a bit from the reference pictures in that I went with a tiger stripe pattern rather than a blotchy type pattern. I kept the colors the same.

Once the figure was painted, I gave him a light application of Testors Dull-Cote to seal the paint. The last detail I needed was the two ammo & grenade pouches worn on the front of his LBE (or what we Marines used to call a "War Belt"). I found one in my parts box that was an exact match (I got it in a trade as part of a big batch of fodder, but I think it came from a Platoon figure). I needed to have two of them, so I made a press mold of the pouch using a block of Super Sculpey. After curing the mold, I made several casts of the pouch (you never know when you might need more). I painted two of them and super glued them in place. They are actually attached to the bottom edge of the vest so that they appear to be on his War Belt right where the suspender straps connect, which would obviously be the proper placement for these type of pouches.

Wednesday, August 11, 2010

Footloose (Infantryman)

Footloose was an Infantryman that was introduced as part of the 1985 wave of ARAH figures. He was one of my favorites, despite the moronic way he was portrayed in the cartoon series.

Parts: Head (RoC TRU Footloose), Upper torso, Lower torso, & Arms (RoC Tunnel Rat), Gloved hands (bbi Elite Force), Legs, Webgear & Knife (25th Anniversary Greenshirt), Helmet (bbi Elite Force Soldier), Backpack (ARAH Footloose v1), M16A2 Rifle (Marauder, Inc.).

Supplies: Dremel, Super glue, X-acto knife, paintbrushes, Testors paints and Testors Dull-Cote.

Reference: Photos of the ARAH Footloose v1 figure.

This was as simple as replacing the head, hands and legs on the base figure and then painting it. The paint scheme was based on that of the ARAH Footloose v1 figure. The backpack was modified to fit the new body style by Dremeling off the post and then drilling a small hole. A short length of plastic rod was super glued into the hole as a new post. After painting, he was given a light application of Testors Dull-Cote.

Cover Girl (Wolverine Driver)

If Cover Girl was supposed to have been this beautiful model who traded in the runway for an Army Motor Pool, then how come almost every figure made of her was so darn ugly? The only really good head sculpt was on the DTC comic pack figure, so when I got my hands on a couple casts of that head, it was off to the races...

Parts: Head (cast of DTC Comic Pack Cover Girl), Entire Body (RoC TRU Dial-Tone), Arms & Jacket (X-Men: Origins Wolverine).

Supplies: Dremel, Super Sculpey, X-acto knife, paintbrushes, Testors paints and Testors Dull-Cote.

Reference: Photos of the ARAH Cover Girl figure.

The hardest part of this figure was tracking down the arms and jacket. It seems that I waited too long to pick up the Indiana Jones figure I had planned on using and ended up hunting the clearance aisles for a worthy substitute. Once I had the arms and jacket from the Wolverine figure, the rest was pretty simple. I cracked the torso and replaced the arms. The pegs on the original hands did not fit the new arms, so I ended up filling the holes with a bit of Super Sculpey and then pushing the hand pegs into the sockets. Once in, I boiled the arms in water to cure the Sculpey. The jacket was trimmed at the waist so that it fell at the appropriate height on her torso. The head was a cast of the original, so it had to be Dremeled out to fit the neck post. The paint scheme was based on that of the ARAH Cover Girl v1 figure. After painting, they were given a light application of Testors Dull-Cote.

Tuesday, August 10, 2010

Cobra Snow Serpents (Polar Assault Troops)

This is the second Cobra Trooper "female conversion" I've done (the first one was the Tele-Viper).

Parts: Head (Star Wars TFU Juno Eclipse), Entire figure (25th Anniversary Snow Serpent)

Supplies: Dremel, X-acto knife, Super glue, paintbrushes, Testors paint, Testors Dull-Cote.

Reference: None.

This figure was much easier than most female trooper conversions, mostly because the character is wearing a bulky snow suit. This meant that I needed to make the figure a bit smaller in stature as compare to most male figures, but I didn't really need to worry much about making it look overly feminine (if you can see curves through a snow-suit, it's too darn tight). So what I did to accomplish this is basically a shortening of the limbs. The legs were easiest. I cut the boots off at the point where they met the snow-suit leg and then used the Dremel to hollow almost half of the lower leg. When I was finished, the boots could be inserted into the lower leg. The new head also lent to the appearance of a shorter person. Assuming that an unaltered Snow Serpent would stand around 6 feet tall, this dropped the female trooper's height about 3 inches or so compared to the unaltered figure. I started to look into shortening the arms, too. I had planned to do this in a similar manner - Dremeling out the gloved forearm so that the arm would fit into it. But I found that when you put all the gear on her, the look was pretty good without risking the potential screw-up in modding the arms. So I left them alone. I used a clear plastic band to attach the helmet to her webgear, as if she had taken it off and hung it there during a break. Should I decide to put the helmet back on, I can always switch them out again. The hair was painted a dark brown and the entire figure was given a light application of Dull-Cote. When the two figures are placed side by side on a flat surface, the top of the female Snow Serpent's head is now approximately flush with where the male's nose would be. In truth, I wanted her to be just a bit shorter, but I didn't want to overdo it and have the body end up looking disproportionate. So I theorized that realistically a taller, longer legged trooper would be more likely to keep up with his or her squad as they snow-shoed across the polar ice and decided that I was happy with it.

Saturday, August 7, 2010

Sgt Humpty (G.I. Joe Marine)

This is the second version of Sgt Humpty that I've done. Those who remember the first version I did know that the head sculpt is of my likeness and my nickname in the Marine Corps was "Humpty"... so he is me.

So as I grew close to the end of my Iron Grenadier project, I started looking for a similar multi-figure project. I eventually decided to do upgrades of the original 13 Joe characters, since I didn't own all of them in the modern era styling. Most of them will be simple improvements to the existing figures, because I thought the majority of them were pretty good. While planning it all out, it occurred to me that it would be kind of cool to give Sgt Humpty a wardrobe change and make him fit in with those iconic characters...

Parts: Head (Sgt Humpty), Entire figure (25th Anniversary comic pack Hawk), LBE (25th Anniversary comic pack Hawk), Helmet (bbi Elite Force Marine), A.L.I.C.E. pack (25th Anniversary comic pack Gung-Ho), Tactical Pistol (Marauder, Inc.), M16A2 Rifle (Marauder, Inc.).

Supplies: Dremel, X-acto knife, sandpaper, paintbrushes, Testors paints, Polly Scale paints, Testors Dull-Cote.

Reference: None.

The original head was removed and tossed into my parts box. The LBE and A.L.I.C.E. pack were painted with a variety of greens to simulate the various shades found in green nylon web gear. The boots were painted to resemble the green canvas-sided jungle boots that I so loved during my service (seriously, I'd still wear them today if they had lasted all these years). The head cast was hollowed out with a Dremel so that it would fit the neck post. The skin was painted a fairly dark tan, so as to imply the tanned features common to troops who spend so much time outdoors. The hair, eyebrows and mustache were painted dark brown, as were the eyes. I dry brushed the brown on the sides and back of the head to simulate the USMC haircut that I don;t think I will ever outgrow. The M16A2 assault rifle is from Marauder, Inc. I'm kind of nostalgic for that weapon after spending so many years carrying one around.