Parts: Entire figure (RoC Shipwreck), Hair (BnB Razor Ramon), H&K G36 Assault Rifle (RoC Pit Commando).
Sunday, October 3, 2010
Shipwreck (Navy SEAL)
Parts: Entire figure (RoC Shipwreck), Hair (BnB Razor Ramon), H&K G36 Assault Rifle (RoC Pit Commando).
Beachhead (Ranger)
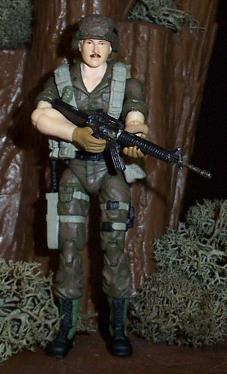
This was basically a rainy-day project when I had no better ideas. The Beachhead figure from the RoC Snarler Cycle set was cool, but I wanted him to fit in better with the "blue camo" appearance of my other RoC figures. So, a new pair of legs and a bit of repainting...


Parts: Head, Torso & Arms (RoC Beachhead), Legs (RoC Sgt Stone), Helmet & Gasmask (PoC Beachhead), Assault Rifle, Ammunition Bag & Spare Magazine (25th Anniversary Beachhead), Vest (???).
Slipstream (X-30 Conquest Pilot)
So as I continued my quest to complete my own 25th Anniversary collection, I came to realize that the "Lt Slip Stream" figure that Hasbro offered us was nothing more than a kit-bash of easily obtained parts. I already had the head I needed, so I set about getting the rest of the parts through trades. A little repainting, and here he is...
Parts: Head (25th Anniversary Tripwire), Torso & arms (25th Anniversary Snow Job), Legs (25th Anniversary Wild Bill), Feet (RoC Wild Bill).
Thursday, September 9, 2010
Law and Order (Military Policeman and K-9 Partner)
Parts: Entire figure (RoC Law), Submachinegun (25th Anniversary Shipwreck), Tactical Vest (RoC Pit Commando), Helmet (RoC Law), Baton (RoC Law), Dog (RoC Order).
Supplies: Paintbrushes, Testors paints, Polly Scale paints, Testors Dull-Cote.
Reference: Still photos of the ARAH Law & Order figures.
Nothing particularly special about this custom. It is a straight repaint of the RoC Law & Order figures that came in the Toys R Us Exclusive 5-pack. I didn't really have an issue with the desert camouflage, but I wanted something closer to the classic look, so I painted them according to that color scheme. The original figure had his shirt tucked in and the sleeves rolled up, but I liked the overall look of this when it was finished. The hardest part of this whole thing was painting the dog's fur to look somewhat realistic!
Wednesday, September 1, 2010
Sgt Slaughter (G.I. Joe Drill Instructor)
Supplies: Dremel, paintbrushes, Testors paints, Folk Art paints, Testors Dull-Cote.
Reference: My son's SDCC Sgt Slaughter figure.
Gung Ho (G.I. Joe Marine)
Supplies: Super Sculpey, super glue, Paintbrushes, Testors paints, Folk Art paints and Testors Dull-Cote.
The base figure was not modified in any significant way, other than the swapping of the legs and the lower arms. The entire figure was then repainted according to the references.
Note: I deviated just a bit from the reference pictures in that I went with a tiger stripe pattern rather than a blotchy type pattern. I kept the colors the same.
Wednesday, August 11, 2010
Footloose (Infantryman)
Parts: Head (RoC TRU Footloose), Upper torso, Lower torso, & Arms (RoC Tunnel Rat), Gloved hands (bbi Elite Force), Legs, Webgear & Knife (25th Anniversary Greenshirt), Helmet (bbi Elite Force Soldier), Backpack (ARAH Footloose v1), M16A2 Rifle (Marauder, Inc.).
Reference: Photos of the ARAH Footloose v1 figure.
This was as simple as replacing the head, hands and legs on the base figure and then painting it. The paint scheme was based on that of the ARAH Footloose v1 figure. The backpack was modified to fit the new body style by Dremeling off the post and then drilling a small hole. A short length of plastic rod was super glued into the hole as a new post.
Cover Girl (Wolverine Driver)
If Cover Girl was supposed to have been this beautiful model who traded in the runway for an Army Motor Pool, then how come almost every figure made of her was so darn ugly? The only really good head sculpt was on the DTC comic pack figure, so when I got my hands on a couple casts of that head, it was off to the races...Parts: Head (cast of DTC Comic Pack Cover Girl), Entire Body (RoC TRU Dial-Tone), Arms & Jacket (X-Men: Origins Wolverine).
Supplies: Dremel, Super Sculpey, X-acto knife, paintbrushes, Testors paints and Testors Dull-Cote.
Reference: Photos of the ARAH Cover Girl figure.
The hardest part of this figure was tracking down the arms and jacket. It seems that I waited too long to pick up the Indiana Jones figure I had planned on using and ended up hunting the clearance aisles for a worthy substitute. Once I had the arms and jacket from the Wolverine figure, the rest was pretty simple. I cracked the torso and replaced the arms. The pegs on the original hands did not fit the new arms, so I ended up filling the holes with a bit of Super Sculpey and then pushing the hand pegs into the sockets. Once in, I boiled the arms in water to cure the Sculpey. The jacket was trimmed at the waist so that it fell at the appropriate height on her torso. The head was a cast of the original, so it had to be Dremeled out to fit the neck post. The paint scheme was based on that of the ARAH Cover Girl v1 figure. After painting, they were given a light application of Testors Dull-Cote.
Tuesday, August 10, 2010
Cobra Snow Serpents (Polar Assault Troops)
Parts: Head (Star Wars TFU Juno Eclipse), Entire figure (25th Anniversary Snow Serpent)
Supplies: Dremel, X-acto knife, Super glue, paintbrushes, Testors paint, Testors Dull-Cote.
Reference: None.
This figure was much easier than most female trooper conversions, mostly because the character is wearing a bulky snow suit. This meant that I needed to make the figure a bit smaller in stature as compare to most male figures, but I didn't really need to worry much about making it look overly feminine (if you can see curves through a snow-suit, it's too darn tight). So what I did to accomplish this is basically a shortening of the limbs. The legs were easiest. I cut the boots off at the point where they met the snow-suit leg and then used the Dremel to hollow almost half of the lower leg. When I was finished, the boots could be inserted into the lower leg. The new head also lent to the appearance of a shorter person. Assuming that an unaltered Snow Serpent would stand around 6 feet tall, this dropped the female trooper's height about 3 inches or so compared to the unaltered figure. I
Saturday, August 7, 2010
Sgt Humpty (G.I. Joe Marine)
So as I grew close to the end of my Iron Grenadier project, I started looking for a similar multi-figure project. I eventually decided to do upgrades of the original 13 Joe characters, since I didn't own all of them in the modern era styling. Most of them will be simple improvements to the existing figures, because I thought the majority of them were pretty good. While planning it all out, it occurred to me that it would be kind of cool to give Sgt Humpty a wardrobe change and make him fit in with those iconic characters...
Supplies: Dremel, X-acto knife, sandpaper, paintbrushes, Testors paints, Polly Scale paints, Testors Dull-Cote.
Reference: None.
Monday, July 26, 2010
Iron Anvil (Iron Grenadier Paratrooper)
Iron Anvil troopers are Destro's elite paratroopers.

These guys were really fun to do because I worked on them alongside my 6-year old daughter, Kate. She knows from watching me make previous customs that IG Officers have purple trim rather than the traditional red of the enlisted troops. One of her favorite colors is purple, so she insisted that she had to be the one to paint the Officer.
Parts: Head (ARAH Viper v4), Entire Body (25th Anniversary Battle Armor Cobra Commander), Parachute Harness (25th Anniversary Snow Serpent), Weapon (RoC Reactive Armor Ripcord).
Reference: Photos of the Convention Exclusive Iron Anvil figure. Also refer to the reference section in the post for Voltar.
These guys are just like the rest of my Iron Grenadier troops. Each figure used the 25th Anniversary Battle Armor Cobra Commander body with a new head and accessories (big thanks to James, for the three Viper heads). The paint scheme was based on that of the convention exclusive Iron Anvil figures. Mind you, Kate has done several figures of her own and she helped paint the Red Cap, but this was the first time she wanted to help work on one of my figures. So, I sat her down and explained that we would each paint our base figure black. I told her it was okay if a little silver showed through, because these would look like scratches on the armor (according to their file cards, Iron Anvil troopers sometimes make parachute drops without parachutes). I painted the red and gold trim on my helmet, but in Kate's case, she was using the original Viper head so it was already purple (mine was cast in white plastic). She just had to paint the black and gold. Both of the parachute harnesses were dyed black and then drybrushed with red or purple (Kate already knew how to drybrush from helping me work on the Red Cap). The rifles were also drybrushed with steel-colored paint on the areas that would be metal. The areas that would be high-impact plastic were left unpainted. After painting, they were given a light application of Testors Dull-Cote. I had parts assembled for three of these guys, but for the moment only the two pictures here are finished. When I get around to it, the third one will be another enlisted man with red trim on his armor. But the fact is that Kate was pretty excited to post these, so she didn't want to wait for me to finish the third one!
D.E.M.O.N. (Iron Grenadier Armored Vehicle)
Once I finished all my Ferret crew members, it seemed only right that I fix up my old D.E.M.O.N. for them, right?

The entire vehicle was disassembled and given a warm, soapy bath. It really needed it after all those backyard battles fought back in the late 80's. Anyway, once the whole thing was clean, I reassembled most of the vehicle.

The clear red piece that fits on the front of the crew cab had been missing since the 80's, so I had to fashion a replacement piece. I used foamboard for this because it is sturdy enough to last indefinitely, but it can slide right out if I am ever able to acquire the proper piece.

I repainted the missiles and guns metallic 14K gold. I took a few liberties along the way because I wanted this thing to really look fantastic. I always thought that there should be a bit more red in the D.E.M.O.N.'s color scheme, so I found ways to work it in.

The entire hull was spray-painted black, eliminating the grey areas. The treads were spray-painted black. After they had dried, I used a rolled up piece of sandpaper to scrape away some of the paint. I'm pretty happy with the results of that. Mechanical parts that would likely show paint wear from use were drybrushed with silver, gunmetal, steel or aluminum paints. The crew cab was painted to show all of the equipment inside. A new set of decals was ordered from J. Ruben, and I must say, they looked fantastic. After the decals were applied, I gave the entire vehicle a light application of Testors Dull-Cote.
The entire vehicle was disassembled and given a warm, soapy bath. It really needed it after all those backyard battles fought back in the late 80's. Anyway, once the whole thing was clean, I reassembled most of the vehicle.
The clear red piece that fits on the front of the crew cab had been missing since the 80's, so I had to fashion a replacement piece. I used foamboard for this because it is sturdy enough to last indefinitely, but it can slide right out if I am ever able to acquire the proper piece.
I repainted the missiles and guns metallic 14K gold. I took a few liberties along the way because I wanted this thing to really look fantastic. I always thought that there should be a bit more red in the D.E.M.O.N.'s color scheme, so I found ways to work it in.
The entire hull was spray-painted black, eliminating the grey areas. The treads were spray-painted black. After they had dried, I used a rolled up piece of sandpaper to scrape away some of the paint. I'm pretty happy with the results of that. Mechanical parts that would likely show paint wear from use were drybrushed with silver, gunmetal, steel or aluminum paints. The crew cab was painted to show all of the equipment inside. A new set of decals was ordered from J. Ruben, and I must say, they looked fantastic. After the decals were applied, I gave the entire vehicle a light application of Testors Dull-Cote.
Metal-Head (Iron Grenadier Anti-armor Specialist)
Parts: Head (Overkill Creations), Upper Torso (RoC Gung-Ho), Lower Torso, Arms & Legs (25th Anniversary Battle Armor Cobra Commander), Armored Vest (25th Anniversary Zartan), Machine Pistol, Missile Launchers & Backpack (ARAH Metal-Head v1).
Supplies: Dremel, nails, torch, super glue, paintbrushes, Testors paints, Testors Dull-Cote.
Reference: Photos of the convention exclusive Metal-Head figure.
Darklon (Iron Grenadier Field Commander)
Parts: Head (ARAH Darklon), Body (Ultimate Battle Pack Destro), Sword Belt (Ultimate Battle Pack Destro), Pistol (RoC Cover Girl).
Supplies: Dremel, paintbrushes, Testors paints, Testors Dull-Cote.
Reference: Photos of the vintage Darklon figure.
Ferret (Iron Grenadier D.E.M.O.N. Commander)
Parts: Head (ARAH Ferret), Entire Body (25th Anniversary Battle Armor Cobra Commander).
Supplies: X-acto knife, paintbrushes, Testors paints and Testors Dull-Cote.
Reference: Photos of the vintage Ferret figure. Also refer to the reference section in the post for Voltar.
The original head was replaced with the Ferret head, which was hollowed out enough to fit the neck post correctly. The belt was modified with the X-acto knife, removing the holster and shaving away the Cobra insignia on the belt buckle. Once that was done, the rest of this was just painting. I modeled this one after the first Ferret I made, except that I substituted purple for the red used on the driver. Once finished, he was given a light application of Testors Dull-Cote.
Ferret (Iron Grenadier D.E.M.O.N. Crewman)
Parts: Head (ARAH Ferret), Entire Body (25th Anniversary Battle Armor Cobra Commander).
Supplies: X-acto knife, paintbrushes, Testors paints and Testors Dull-Cote.
Reference: Photos of the vintage Ferret figure. Also refer to the reference section in the post for Voltar.
The original head was replaced with the Ferret head, which was hollowed out enough to fit the neck post correctly. The belt was modified with the X-acto knife, removing the holster and shaving away the Cobra insignia on the belt buckle. Once that was done, the rest of this was just painting. Like the first Ferret I made, I tried to stay faithful to the color scheme of the original figure as much as possible. But this one felt kind of odd in the respect that the first one came to me naturally and this one I tried deliberately to make him less flashy. Once finished, he was given a light application of Testors Dull-Cote.
Tuesday, July 20, 2010
Undertow (Iron Grenadier Diver)
Wednesday, July 14, 2010
Nullifier (Iron Grenadier Pilot)
Parts: Entire figure (25th Anniversary Battle Armor Cobra Commander), Helmet (ARAH Nullifier v1), Submachinegun (RoC Pit Commando).
Supplies: Dremel, X-acto knife, paintbrushes, Folk Art paints, Testors Dull-Cote.
Reference: ARAH Nullifier v1.
Okay, if you read the post for my T.A.R.G.A.T. figure, then you know exactly how I did this one. The helemt is an ARAH Nullifier head that I hollowed out with the Dremel. This took nearly an hour to do because I ended up having to get the walls of the helmet so ridiculously thin in order to fit on the head. The Battle Armor Cobra Commander figure was repainted in a color scheme that was close to the vintage look, but like I said, spiced up a little bit. He is armed with a compact submachinegun that could be easily stowed in his cockpit. Finally, I gave him a light application of Testors Dull-Cote. All in all, it was a pretty simple custom, but I really like how it turned out! The last photo here shows Nullifier in the cockpit of my custom A.G.P. (Anti-Gravity Pod).
Tuesday, July 13, 2010
T.A.R.G.A.T. (Iron Grenadier Rapid Deployment Trooper)
Parts: Entire Figure (25th Anniversary Battle Armor Cobra Commander), Helmet (ARAH T.A.R.G.A.T.), Pistols (25th Anniversary Iron Grenadier), Holster Belt (Star Wars Fenn Shysa), Grenade Bandolier (RoC Monkeywrench), Flightpack (RoC General Hawk).
Supplies: Dremel, paintbrushes, Testors paints, Testors Dull-Cote.
Reference: ARAH T.A.R.G.A.T. figure.
Tuesday, July 6, 2010
Annihilator v1 (Iron Grenadier Heli-Assault Trooper)
Parts: Head (ARAH Annihilator), Body (25th Anniversary Battle Armor Cobra Commander), Belt (25th Anniversary Cobra Commander), Heli-pack (Specialist Trakker), Submachinegun (Specialist Trakker).
Supplies: Dremel, Super glue, paintbrushes, Testors paints, Testors Dull-Cote.
Reference: Photos of the vintage Annihilator figure. Also refer to the reference section in the post for Voltar.
Subscribe to:
Posts (Atom)